![logo.svg]](https://help.singabusiness.com/hubfs/logo.svg)
With Custom files, Singa Pro plays your existing MP4, AVI, CDG + MP3 and MP3+G ZIP files alongside the Singa catalog, so your hosts can run everything from one place.
NOTE: Your files are never uploaded to Singa. Files you add with Add files are copied into Singa Pro’s folder on this computer, and folders you add are read where they are.
Supported file types
- MP4
- AVI (requires FFmpeg, see below)
- CDG + MP3: the CDG graphics file and its MP3 audio file go together, so keep both in the same folder with the same file name. Upper and lower case don’t matter. If the MP3 is missing, the song shows as unavailable with the message “CDG karaoke requires a .cdg and .mp3 with the same filename in the same folder. Import both files, then Rescan.”
- ZIP (MP3+G): .zip archives with CDG + MP3 pairs inside. Each CDG in the archive becomes its own song.
AVI files need FFmpeg
Singa Pro doesn’t include FFmpeg, so you need to install it yourself before AVI files will play. Without it, every AVI file shows: “Install FFmpeg and ffprobe, then click Rescan.”
- Mac: Install it with Homebrew:
brew install ffmpeg - Windows: Install FFmpeg and add its bin folder to PATH, then restart Singa Pro.
Once FFmpeg is installed, click Rescan.
Finding Custom files
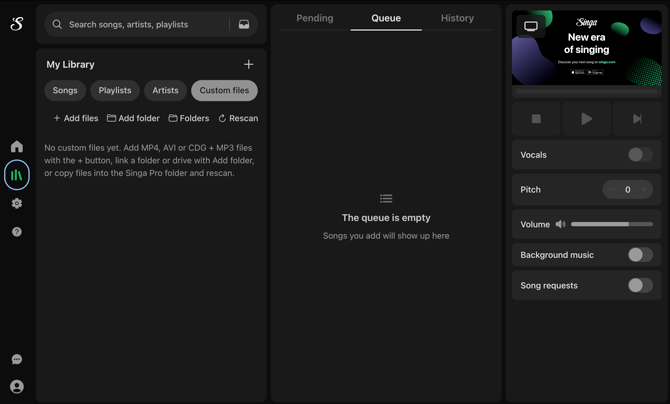
- Open Singa Pro and go to My Library from the left-hand menu.
- Click Custom files.
You’ll see four options here: Add files, Add folder, Folders and Rescan. You can search your custom files with the “Search custom files” box.
Adding your files
There are three ways to bring your files into Singa Pro. Use whichever suits how your library is organized.
Option 1: Add individual files
- Click Add files, or the + at the top of My Library while you’re on Custom files.
- Choose the files you want from your computer.
This works best for adding a few songs at a time. Singa Pro copies each file into its own folder on your computer, so the files take up extra disk space. For CDG + MP3, you only need to choose the CDG file, and the matching MP3 in the same folder is added automatically.
Option 2: Link a folder or drive
- Tap Add folder.
- Pick the folder or external drive where your karaoke library is stored.
Singa Pro adds every supported file in that folder, including its subfolders. If your library is already organized on a hard drive, this is the quickest way to bring all of it in.
If the drive is disconnected, its songs stay in the list but are greyed out, with the message “Folder not found: [path]. Reconnect the drive, then Rescan.” Any songs from that drive in the queue are skipped. When you plug the drive back in, the songs come back on their own within about a minute, or right away if you click Rescan. If the drive comes back with a different drive letter or name, go to Folders > Locate folder... and point Singa Pro to the folder’s new location.
To see or manage the folders you’ve linked, click Folders. The Folders menu has:
- Open Singa Pro folder
- Each linked folder, with Open folder and Remove from Singa (files stay on disk)
- An Unavailable label and a Locate folder... option for any folder Singa Pro can’t find
Option 3: Copy files into the Singa Pro folder
- Click Folders > Open Singa Pro folder, then copy your files into it.
- Go back to Custom files and tap Rescan.
The folder is located at:
- Mac: ~/Library/Application Support/Singa Pro/custom-karaoke (the Library folder is hidden by default)
- Windows: %APPDATA%\Singa Pro\custom-karaoke
Keeping your library up to date
Singa Pro picks up changes automatically. When you add, move or delete files in a linked folder or in the Singa Pro folder, it notices within a few seconds. It also checks every minute and every time the app starts. If something doesn’t appear, click Rescan. Rescan also retries files that failed earlier, for example after you install FFmpeg.
Removing songs
You can’t remove a single song from inside Singa Pro. To remove one, delete the file from its folder. To remove a whole folder, go to Folders and select Remove from Singa. The files stay on your disk.
How songs are named
The song title is the file name, exactly as it is. Singa Pro doesn’t read an artist from the file name, so a file called “Artist - Title.mp4” shows up with the title “Artist - Title” and no artist.
Playing custom files
Once your files have been added, you’ll find them under My Library → Custom files. Add them to the queue the same way you’d add any Singa song.
Custom files also appear in the main search. Search results have a Custom files tab, and the All tab shows custom files as their own group with a “See all custom files” link. Search matches the title, folder name and file name, and it works offline.
Play now in the “…” menu moves the song to the top of the queue and stops the song that’s currently playing.
Custom files work offline and also play on the second screen. They work a bit differently from Singa catalog songs:
- You can change the key.
- Guide vocals aren’t available.
- You can’t add them to playlists or favorites.